In this blog story, you will learn how to implement a simple and modular pipeline for image processing. We will use OpenCV for image processing and manipulation and Python generators for the steps of the pipeline.
An image processing pipeline is a set of tasks executed in a predefined sequence order to transform the image into the desired result or extract some interesting features.
Task examples could be:
- image transformations like translation, rotation, resizing, flipping and cropping,
- enhancement of the image,
- extraction of the region of interest (ROI),
- computing feature descriptors,
- image or object classification,
- object detection,
- image annotations for machine learning,
and many more.
The final result could be a new image or just a JSON file containing some information about the image.
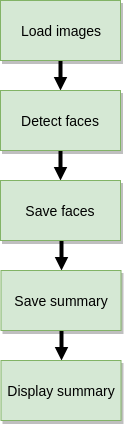
Let’s assume that you have a load of images in a directory and want to detect faces on them and write each face to a separate file. Additionally, you would like to have some JSON summary file which tells you where faces were found and in what file. Our face detection pipeline would look as follow:
It is quite a trivial example which can be summarized with the following code:https://medium.com/media/81e458ca426ccbc6c33339bd211a1942Simple image processing script for face detection and extraction
Even the comments in the code are quite exploratory let’s dive in.
First, we define command-line argument parser (line 6–20) to take the following arguments:
--input: this is our path to the directory containing our images (could be with subdirectories). It is the only mandatory argument.--output: output directory where the results of the pipeline will be saved.--out-summary: if you want to have a JSON summary just provide the name for it (output.json for example).--classifier: a path to the pre-trained Haar cascade for face detection
Next, we define thelist_images function (line 22–34) which will help us to walk through the input directory structure to grab the image paths.
For face detection, we use the Viola-Jones algorithm known as Haar cascade (line 40). It was published in 2001 by Paul Viola and Michael Jones. You can learn more about the algorithm from their original paper Rapid Object Detection using a Boosted Cascade of Simple Features or Wikipedia page.
It is quite an old algorithm in the era of deep learning and false-positives prone (reporting a face in the place of the image where no face is present). Even though it is quite easy to use for our demonstrative case.
The main processing loop goes as follow: we walk through image files (line 49), read them (line 51) one by one, detect the faces (line 55), save them to the prepared directory (line 59–72) and saving a summary report (line 78–82) with faces coordinates.
You can find the whole source codes, environment setup and example images for this story in the below repository:jagin/image-processing-pipelineModular image processing pipeline using OpenCV and Python generators. This project is using Conda for project…github.com
Prepare the project environment:
$ git clone git://github.com/jagin/image-processing-pipeline.git
$ cd image-processing-pipeline
$ git checkout 77c19422f0d7a90f1541ff81782948e9a12d2519
$ conda env create -f environment.yml
$ conda activate pipeline
Ensure you checkout the 77c19422f0d7a90f1541ff81782948e9a12d2519 commit via the command listed above to use the code out of the box with this story.
Let’s run it:
$ python process_images.py --input assets/images -os output.json
We got a nice looking summary:
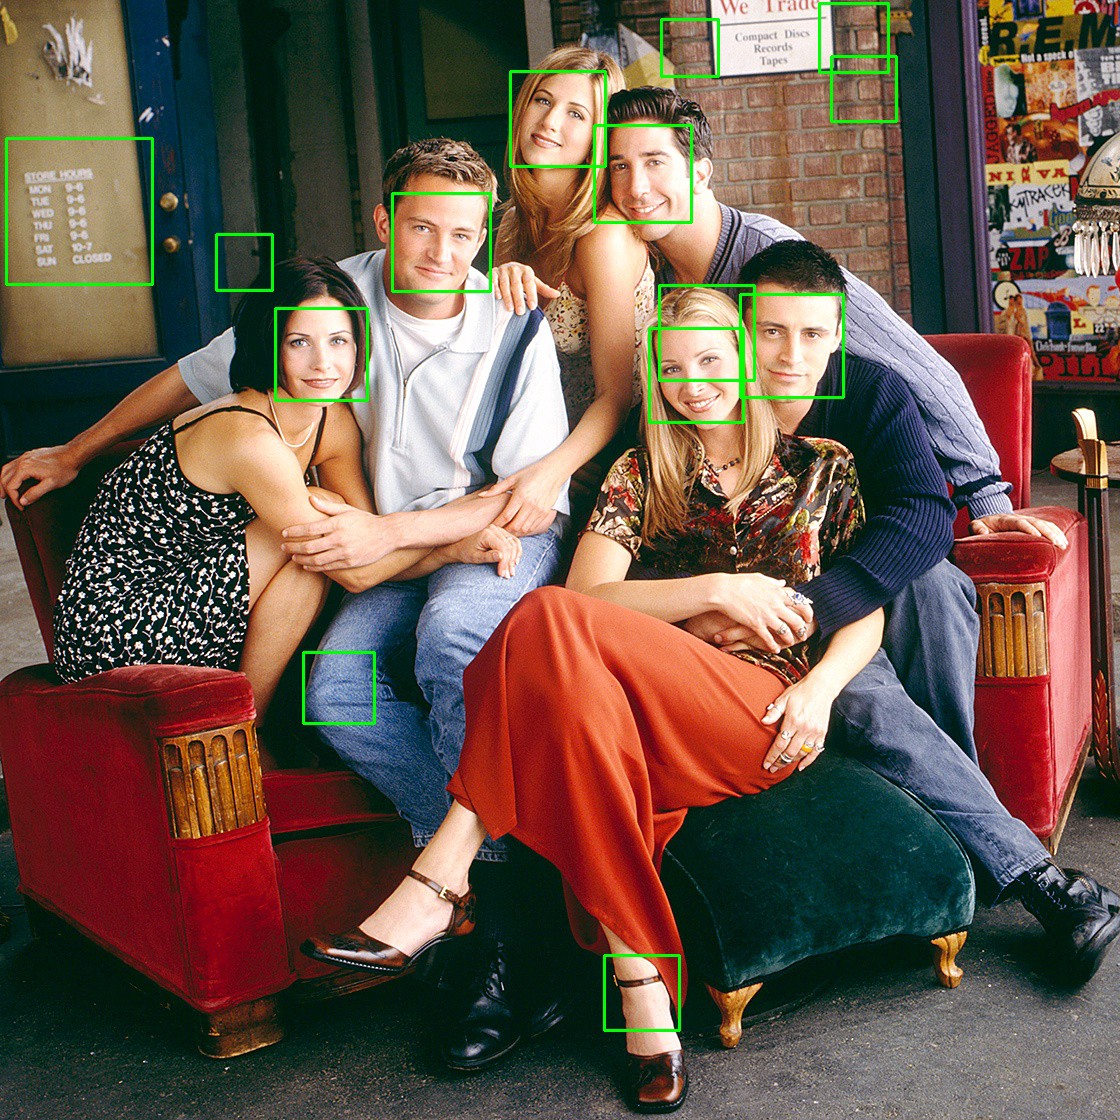
[INFO] assets/images/friends/friends_01.jpg: face detections 2
[INFO] assets/images/friends/friends_02.jpg: face detections 3
[INFO] assets/images/friends/friends_03.jpg: face detections 5
[INFO] assets/images/friends/friends_04.jpg: face detections 14
[INFO] assets/images/landscapes/landscape_01.jpg: face detections 0
[INFO] assets/images/landscapes/landscape_02.jpg: face detections 0
[INFO] Saving summary to output/output.json...
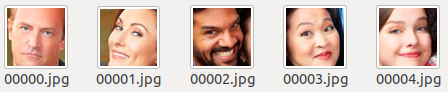
The images of the faces (false-positives too) are stored in a separate directory for every image.
output
├── images
│   └── friends
│       ├── friends_01.jpg
│       │   ├── 00000.jpg
│       │   └── 00001.jpg
│       ├── friends_02.jpg
│       │   ├── 00000.jpg
│       │   ├── 00001.jpg
│       │   └── 00002.jpg
│       ├── friends_03.jpg
│       │   ├── 00000.jpg
│       │   ├── 00001.jpg
│       │   ├── 00002.jpg
│       │   ├── 00003.jpg
│       │   └── 00004.jpg
│       └── friends_04.jpg
│           ├── 00000.jpg
│           ├── 00001.jpg
│           ├── 00002.jpg
│           ├── 00003.jpg
│           ├── 00004.jpg
│           ├── 00005.jpg
│           ├── 00006.jpg
│           ├── 00007.jpg
│           ├── 00008.jpg
│           ├── 00009.jpg
│           ├── 00010.jpg
│           ├── 00011.jpg
│           ├── 00012.jpg
│           └── 00013.jpg
└── output.json
The summary file output.json will contain the coordinates of the faces (x, y, width, height):
{
  "assets/images/friends/friends_01.jpg": {
    "output/images/friends/friends_01.jpg/00000.jpg": [
      434,
      121,
      154,
      154
    ],
    "output/images/friends/friends_01.jpg/00001.jpg": [
      571,
      145,
      192,
      192
    ]
  },
  ...
}
So what’s the case? What works, works, isn’t it?
The above example is not complicated, has a few steps so it is tempting to quickly create a simple script but quickly it’s getting complex.
In one of the projects, I was working on gait recognition. The pipeline contains the following steps:
- capture video
- detect persons
- estimate person pose
- track pose
- create masks
- buffer masks sequence
- encode gait
- identify gait embedding
- display results
and there were much more for data annotation, metrics generation and so on.
The problems starting to appear when your pipeline is growing and you are not alone working on it. There are other teammates working on different steps. Some parts of the pipeline can be reusable in other pipelines (for example reading images, capturing videos etc.).
We need the pipeline to be modular!
We also need a neat way to pass the data between the steps of the pipeline. Looking for the solution I stumbled on the clever code snippet which allows me to create Unix like pipeline using Python generators.https://medium.com/media/4995c6bcfe4e85a1983a6591fea44fb2Credits to Alexandre Macedo
This simple example creates a pipeline to print the first 10 numbers which are even and multiple of 3.
$ python example_pipeline.py
0
6
12
18
24
30
36
42
48
54
The most important and most interesting part is thePipeline generator class itself:https://medium.com/media/98d4c77e87e2e752826e5bee04ff5af0Pipeline step abstract class
What are Python generators? On Python Wiki we can read:
Generator functions allow you to declare a function that behaves like an iterator, i.e. it can be used in a for loop.
In other words, a generator is a function that returns an object (iterator) which we can iterate over (one value at a time).
The Pipeline is an abstract class which contains agenerator function (line 8–12) which by default pass our data (from the previous generator) through filter function (line 18–19) and map function.
The filer function allows us to filter the data passing our pipeline (as in Even class from the code snippet above). The map function gives us the possibility to manipulate (map) the pipeline data or update the state of the step as in First class.
By overriding an__or__ operator, it is possible to create Unix like pipeline: load_images | detect_faces | save_faces | display_summary.
The first step of the pipeline must generate our input data so we have to override the generator function. In our case, the input data is a list of images to process. Let’s decouple our loading images part into the pipeline step called LoadImages:https://medium.com/media/22e91b58152f6726978ff7ca8d1e4980Pipeline generator step loading images
We can see that the generator will yield the following dictionary structure for every image file it finds in the src directory:
data = {
    "image_file": image_file,
    "image": image
}
For every file we got the path to the image file and the binary of the file (as ndarray from Numpy).
Using object-oriented programming we could extend LoadIamges class and override filter function in the case where we would need to filter out image files containing a selected word in the file name or path.
The next step is detect_faces:https://medium.com/media/131c87d84bb999747109e6bbce2f87acPipeline step detecting faces
which will consume the data from source generator (the load_images) in the map function, extract the image binary (line 14), detect faces (line 17–18) and enrich the data with the faces coordinates (line 20) for the next step.
We can enclose the whole pipeline in the followingmain function:https://medium.com/media/a09faf718600a35c26cd287bc85f6cd5Process images pipeline
where the logic of the single step is separated and the main function is clean and neat and functionality is the same as the script from the beginning of the story.
Modularization of the processing pipeline let us reuse the CascadeDetectFaces class also with video processing:
python process_video_pipeline.py -i assets/videos/faces.mp4 -ov faces.avi -p
 12%|█████████████████████████████████▋                                                                                                                                                                                                                                                | 71/577 [00:08<01:12,  6.99it/s]
with the following sample result:

CascadeDetectFaces is not perfect but we can create another implementation using some Deep Learning model and cv2.dnn module from OpenCV which would be more accurate and easily replace it in the pipeline.
I will leave it for another story. Happy coding!
